


When dealing with MANY clients at once, it is soooooo important to be organized. Not just before the session/wedding but after! From start to finish, filing needs to be a key factor in a photography business. There are many things I could go over in this posting but I was recently approached with this question or how I organize my files. I’ve developed a system over the past couple years that I’m so comfortable with and I hope this will give you a bit of inspiration to do the same! It’s super easy and it really keeps you on track. I’m ALLLLL about organization and having a great system so of course having a self owned business forces you to discover systems that work and doesn’t work. I believe it is important to have mistakes to learn and improve which is exactly what I’ve developed below. I’m going to go through the steps I take from the moment I get home from a wedding/session to the last step I do with their photos. Now, I’m not in anyway saying that you should do this. I’m saying that this really works for me at the moment and of course maybe I’ll find myself changing this over the next couple more years. We have to constantly keep improving ourselves. 🙂
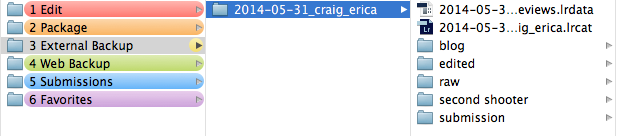
Hopefully this doesn’t bore you too much! 😉 This stuff gets me excited because I LOVE discovering new organization methods! Here’s a photo from Craig & Erica’s wedding last weekend for your viewing pleasure! Haha!

STEP ONE: INITIAL BACKUP/EDITING Immediately when I get home from a wedding/session, I back up all of the photos onto my external hard drive. The great thing about my external hard drive is that it mirrors the information. I have two 2 TB disks in my drive so in case one disk fails, I have the exact same information on the other disk. It’s okay to be paranoid because these are precious photos you do NOT want to mess with. It is also important to have a second backup on top of the external hard drive! This is where I will bring it to my working computer. I create a catalog in Lightroom for each client of mine and label it with the date first and then their names. I arrange it by date so I know what needs to be prioritized when I am editing (example: 2014-06-04_sam_kristin). I always arrange the year first, month, day then the male, female name. Once a folder is created with the catalog, I place it in the “EDITING” folder of my workflow system. In Sam & Kristin’s folder, I create a folder named “RAW” where I create my second backup of the photos. Be sure to backup the photos straight from the cards and not from the external hard drive. We want originals of everything! We need to think about every situation … what happens if you happen to not back up all of the files from the first back up and you copied those exact files to your computer without realizing that you missed a few of the photos from the card? It’s important to back up ALL original photos for all backups. 🙂 Here’s an example of what it looks like below of one session I’m currently working on:

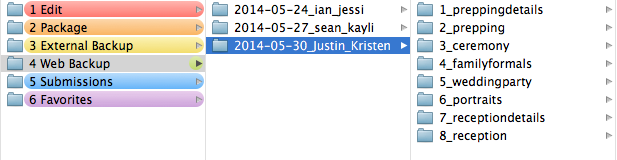
STEP TWO: PACKAGING Once you are completely done editing the photos, I export the Lightroom catalog so it only saves the files I edited. This will also allow me to go back in the future to make any adjustments if needed. I haven’t had to, but it is just a good precaution to do so. Remember, there is always the first backup just in case that is also mirrored. Once the catalog is completed, I will export selected images or all in a series of different sized files depending on the use and place them in their own folders (full size, blog, submission, album, etc.). I will then place this folder into “PACKAGE” and place the “edited” images onto a USB Drive. Here’s a wedding I’m just exporting onto a USB Drive to send out to the couple. 🙂 I love sharing this organization with the couple as they also have their photos broken down by portions of the day. It seems overwhelming to hand over hundred of photos all at once. Having them divided up by category creates a pleasing and relaxing experience going through the photos.

STEP THREE: EXTERNAL HARD DRIVE FINAL BACKUP I will then take the entire folder of the Lightroom catalog, edited files, unedited files, blog folder … basically everything and back it up on my external hard drive again. Again, the hard drive is mirrored, so I technically will have 2 copies of this just in case! Now that I’m done with exporting Craig and Erica’s edited photos on their USB Drive, I can then export the entire folder onto my external.
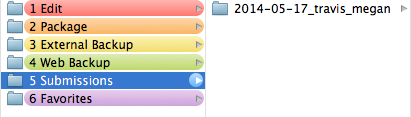
STEP FOUR: WEB FINAL BACKUP I’ll move the folder over to the “WEB BACKUP”, but here I can discard everything except for the final edited photos. For my online backup, I only need a third backup of the edited images for safe keeping and storage. Here’s what my web backup folder looks like right now below. I’m just about done backing up Ian & Jessi’s photos but my web crashed after backing up too much at once. 😉 Oops! With weddings, I’ll still leave them in their categories when backing up so I know where to find a certain file I’m looking for.
STEP FIVE: SUBMISSIONS If there is a wedding or session that really fits into a certain wedding blog/magazine, I will gather the photos and place them in this “SUBMISSIONS” folder to send in.
STEP SIX: FAVORITES Before completely finishing off the photos and discarding from my computer to allow space for the next wedding/session to come through I make sure to take some of my favorites from the wedding/session so I’m not having to go back through hundreds of photos months later trying to find new photos to use for marketing/website update/etc. I also break down my “FAVORITES” folder down so it is easy to navigate through. 🙂 Here is an example below:
 STEP SEVEN: DONE! Congrats! You’re done! Now it is time to discard any photos not being put to use on your working computer. As my geeky brother taught me, you should NEVER use your computer as storage. It should be only for working files. He is completely true! I’ve had a MacBook Pro die on me before when I was in college! Never depend on your computer or even just an external hard drive. Which is exactly why I use disk external drives for mirroring on top of a web backup. I would be more than happy to chat about external hard drives but that is for another time as I hope I have not already bored you! 😉
Okay … now it is time to reveal Yesterday’s Giveaway WINNER!!! ….
I cannot thank everyone ENOUGH for the sweet Birthday wishes yesterday! Truly, you made my day extra special! To be honest, when I put together yesterdays giveaway I was hoping for at least 20 people to be interested … well, instead I was BLOWN away and overwhelmed when I saw this morning that about 250 ENTRIES were submitted!!!! HOLY COW. Literally, my jaw dropped when I saw this! But after a random selection, I have a WINNER of the giveaway!!!
CONGRATS JESSICA KRUEGER!!!!


+ COMMENTS
add a comment