


Back in April, Alex and I drove up to this sweet and cozy cape cod house with instant gratification! It wasn’t the standard, cookie-cutter Florida neighborhood with the same looking house with barely any yard. The community was well maintained, which was a surprise driving through other areas, and it was beautifully landscaped with great places to take Ollie on walks! But I was along for the ride and didn’t want to voice an opinion that would possibly persuade his judgment. Although, Alex knows what he likes and doesn’t like, so I doubt I would have convinced him otherwise! 🙂 Of course, though, I steered cautiously, and after we left the house after touring it and he said he loved it, I was overjoyed to feel the same!!!! I went into the process optimistically because I knew cosmetic things can be easily changed if there was something that could use some sprucing!
When Alex moved into his house the end of May, there wasn’t any time to get him settled before I had to go back to Virginia to photograph my sweet friends, Taylor and Katherine’s wedding! As I have made these trips back and forth to Florida the past few months, I wanted to occupy my time while he was at work to make his home feel homier. I have several projects I’m excited to share with you all, but I thought I would share this easy afternoon project with you all! 🙂
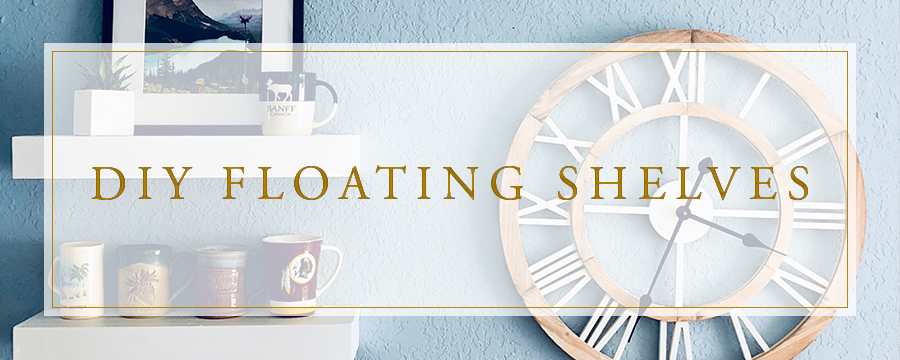
DIY Floating Shelves
BEFORE
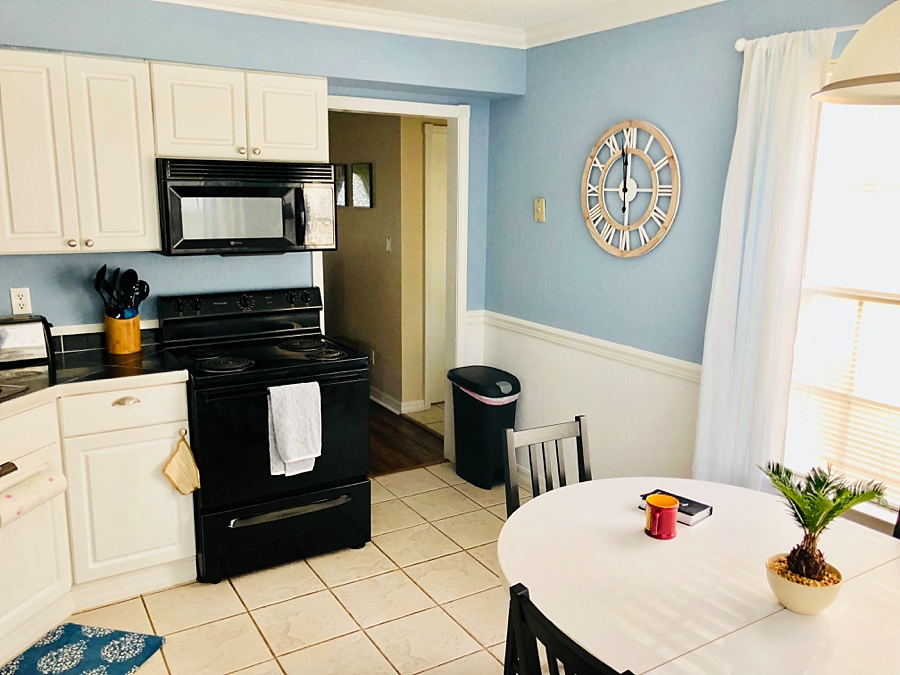
Of course, I have to show you a photo before he was able to get settled in. 😉 HA! His entire house was painted in this tan color, and as much as I appreciate them trying to bring color to the walls, I knew we needed a switch! Since Alex lives at the beach, we thought blue and white would be appropriate to brighten up the kitchen. 🙂 And, boy, did it make a difference!
As you can see below, it definitely made the room brighter!! And not just because I played with the exposure on the photo. 😉 Ha!
So I didn’t anticipate building floating shelves, but I was lulling around one afternoon and was brainstorming ways to create more storage in his kitchen. As much as I LOVE his house, the kitchen cabinet storage is pretty minimal. Nothing wrong with that, but there are only two drawers, two lower cabinets, two double door upper cabinets, two smaller upper cabinets (above the refrigerator and microwave) and a one door cabinet in the kitchen that can be used for storing away kitchen items. For a male, that’s great! For a female … Well, let’s just say there’s only so much that can be simplified. What about that ice cream maker that I’ll want to use one day?! 😉 HA!
I knew building the butlers pantry around the corner from the kitchen was going to help tremendously on storage (blog post coming soon about that project!!!), but while I was brainstorming, the telephone wall plate caught my attention. I first thought, “maybe there’s a way to cover it up.” But then that thought led me to floating shelves to not only cover up the wall plate but create storage for coffee mugs or whatever! So after seeing Alex’s enthusiasm for the idea, I went to work that afternoon!
The first thing I did was place painters tape on the wall to the size and placement I wanted. This was great because I got to see a little visual before making moves, and after making sure the tape was leveled so I could use it as a direct guide, I was able to write on the tape to mark studs and measurements. 🙂 From there, I brought the design to paper to write up my supply list and strategize.
What you need to build 3 floating shelves:
Tape measurer
Pencil + Paper
Painters Tape
Leveler
Six 3″ Wood Screws (2 per shelf to mount on wall) — Check your stud placement because you might need wall anchors! I hit one stud but had to use a wall anchor for the left side of the shelf.
2″ Wood Screws (securing pieces together)
Brad nails
Wood glue
1×2 pine boards (inner frame)
Three 1×6 pine boards (top)
1/2×3 trim pine boards (sides)
Caulk
High White Gloss Trim Paint — Although, I believe I used furniture paint!
Tools:
Miter saw (or anything that will quickly make straight cuts)
Drill + bits
After I bought and gathered my supplies, I cut all of my pieces to the desired lengths. I went ahead and installed the wall anchors and marked/drilled wall mounting holes into my cut wood pieces. When you cut your inner frame pieces, don’t forget to consider the thickness of the wood!

Glue cut pieces together and drill holes on the backside to efficiently guide your screws into each support arm. I used six 2″ wood screws per shelf to build the inner frame. After your structure is built, mount it to the wall! YAY!
The fun part is building the actual shelf! Do the same thing with the shelf cover as you did with the frame — Cut, glue and drill! Again, when you are making your cuts, make sure to consider the thickness of the wood pieces. Since I used trim pieces for the sides, I instead nailed brad nails to attach the sides to the 1×6 top board.

Now it’s time to caulk and paint!!! Or if you prefer to use wood filler and stain it, either option works, depending on the room and your vision! 🙂
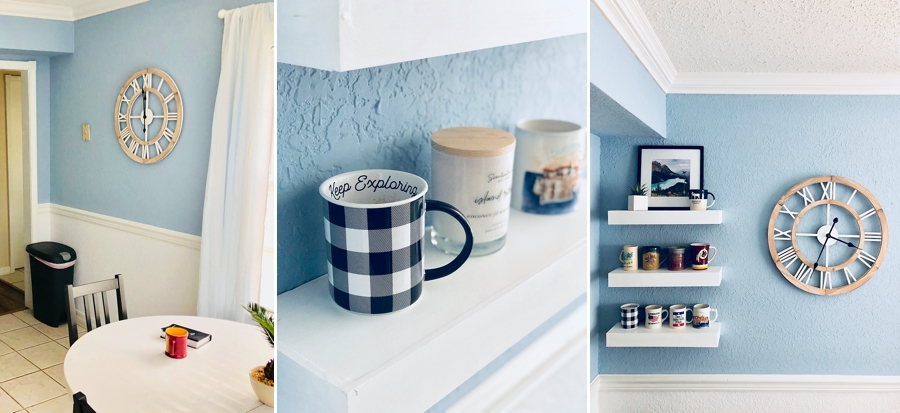
Store coffee mugs or decorations or both on the shelves, and call it a day! Quick and easy afternoon project completed! Kudos!!!
So you saw the before photo above … here is the AFTER!!!
 I love the results and believe it was the best use of the wall/space! I will probably replace out the telephone wall plate, but now it’s not even noticeable. 🙂
I hope this inspires you to tackle your own floating shelves!!! You’ll feel great knowing that you built it from scratch!


+ COMMENTS
add a comment